Sarah
Monday, May 27, 2013
Summer!
Summer is Coming! And with it more Time! No more homework to do or tests to study for! So I should have more time to blog- what do you want to see/ hear about? I plan to tryout some Pinterest pins so maybe reviews on how thy works? Any tutorials you want to see? Let us know!
Monday, April 15, 2013
Vacation!
It is school vacation week here! That normally means a week full of big ideas of what you would like to accomplish and do- and by the end of the week you have done none of them! But not this time! I am going to spend my week being productive... Or at least I am going to keep telling myself that... :)
I do know for a fact a that today I am going up to Jericho, Vermont to visit the Snowflake Bentley Museum... Fun right? :) Ok well I am a self proclaimed nerd and ever since I heard about this guy in kindergarten I have been fascinated! I loved the idea of taking picture of the snow- or maybe it was just all the snow itself! (I also cannot get enough of the snow). And when we had to choose a topic in History to write a 10 page paper on, I jumped at the chance to write about this dude. He lived a pretty cool and inspirational life. So today I am going to go up to his hometown and go to the one room museum... hopefully the grade on the paper makes the 3+ hour trip worth it.
What am I going to do for the rest of the week you ask? Well I have no idea! I might sew a maxi skirt... or I might play with my perlers (more on this unhealthy obsession later...), or I may read....
What should I be doing? I should be writing that 10 page paper or writing the lab report that will be due next week... and I probably should also work on all those Latin verbs I keep forgetting... But I seriously doubt any of these things are going to happen... well I doubt that most of the first list will get done too :)
~sarah
Sunday, April 14, 2013
Book Review: Good Girls Don't Have to Dress Bad
Wow- that was one long hiatus! I cannot believe neither Sonja nor I have blogged in months! Things have been crazy, and I plan to blog more regularly now that school is winding down!
So the other day after staring at it on Amazon for almost a year, I did it... I bought Shari Braendel's book. I found it cheaper on iBooks and I convinced myself that it was ok to spend the money and strain my eyes (I was reading it on my iPhone)- I was sure that the material was worth it. And it was. I was not in LOVE with the book... but I enjoyed it.

Shari wrote this book to help other Christian Woman dress better. Now I know what you are thinking... God doesn't care what we look like on the outside- this is what I thought too. And then I read Shari's book and I have to say her argument it quite good. God wants us to to be walking billboards for HIM! So why should we only wear t-shirts and jeans? We should dress cute and love the body He gave us!
Shari saw the need in the church and began her ministry. I have learned different things about my body through this book. She teaches how to determine your body type and what colors and clothing looks good on you. This book is awesome because not only does it offer fashion advice but it does it with a Christian Twist. We need to love the body God gave us! He thinks we look good and cute and we need to think so too!
I personally loved the last chapter of the book on Modesty. I am a big advocate for helping this generation learn what is Modest and how what we dress affects our Brothers in Christ. Shari's blunt approach is just the wake-up call we all need. (If you want to read more about modesty, I recomend this AMAZING lady!)
God made you beautiful because He is beautiful! Embrace your Beauty!
~Sarah
What books have you read lately? I am always looking for suggestions!
I was not asked to write this review and did not receive this book for free. I bought this book with my own money and wrote this with my real opinions because I think this is an important message to share.
So the other day after staring at it on Amazon for almost a year, I did it... I bought Shari Braendel's book. I found it cheaper on iBooks and I convinced myself that it was ok to spend the money and strain my eyes (I was reading it on my iPhone)- I was sure that the material was worth it. And it was. I was not in LOVE with the book... but I enjoyed it.
Shari wrote this book to help other Christian Woman dress better. Now I know what you are thinking... God doesn't care what we look like on the outside- this is what I thought too. And then I read Shari's book and I have to say her argument it quite good. God wants us to to be walking billboards for HIM! So why should we only wear t-shirts and jeans? We should dress cute and love the body He gave us!
Shari saw the need in the church and began her ministry. I have learned different things about my body through this book. She teaches how to determine your body type and what colors and clothing looks good on you. This book is awesome because not only does it offer fashion advice but it does it with a Christian Twist. We need to love the body God gave us! He thinks we look good and cute and we need to think so too!
I personally loved the last chapter of the book on Modesty. I am a big advocate for helping this generation learn what is Modest and how what we dress affects our Brothers in Christ. Shari's blunt approach is just the wake-up call we all need. (If you want to read more about modesty, I recomend this AMAZING lady!)
God made you beautiful because He is beautiful! Embrace your Beauty!
~Sarah
What books have you read lately? I am always looking for suggestions!
I was not asked to write this review and did not receive this book for free. I bought this book with my own money and wrote this with my real opinions because I think this is an important message to share.
Wednesday, February 20, 2013
Duct Tape Flower #3 Tutorial
Here is another Duct Tape Flower Tutorial for you to enjoy! The center of this flower is exactly the same as our tutorial for A Small Duct Tape Rose, so if you know how to make that- then you will be golden when you make these!

What you Need:
Duct Tape
Wire
Wire Cutters
Scissors
Cutting Mat or Ruler


What you Need:
Duct Tape
Wire
Wire Cutters
Scissors
Cutting Mat or Ruler
Step 1:
Measure out a strip of Duct Tape 8 inches long

Step 2:
Cut the tape in half so that you have 2 strips of 8 inches

Step 3:
Cut about 1 inch by 1 inch squares from the 2 strips of tape

Step 4
Flip the a square over and fold one corner down so that you have an "L" of sticky side remaining

Step 5:
Fold down the other corner so that you have a triangle with a base of exposed adhesive

Step 6:
Continue doing this to all of your squares

Step 7:
Take one of your triangles and roll it so that it forms a cylinder shape.

Step 8:
Begin to add the rest of the triangles onto your center. (Please excuse the awful looking nails- I almost went and repainted them just so that I could take this photo...but i didn't)
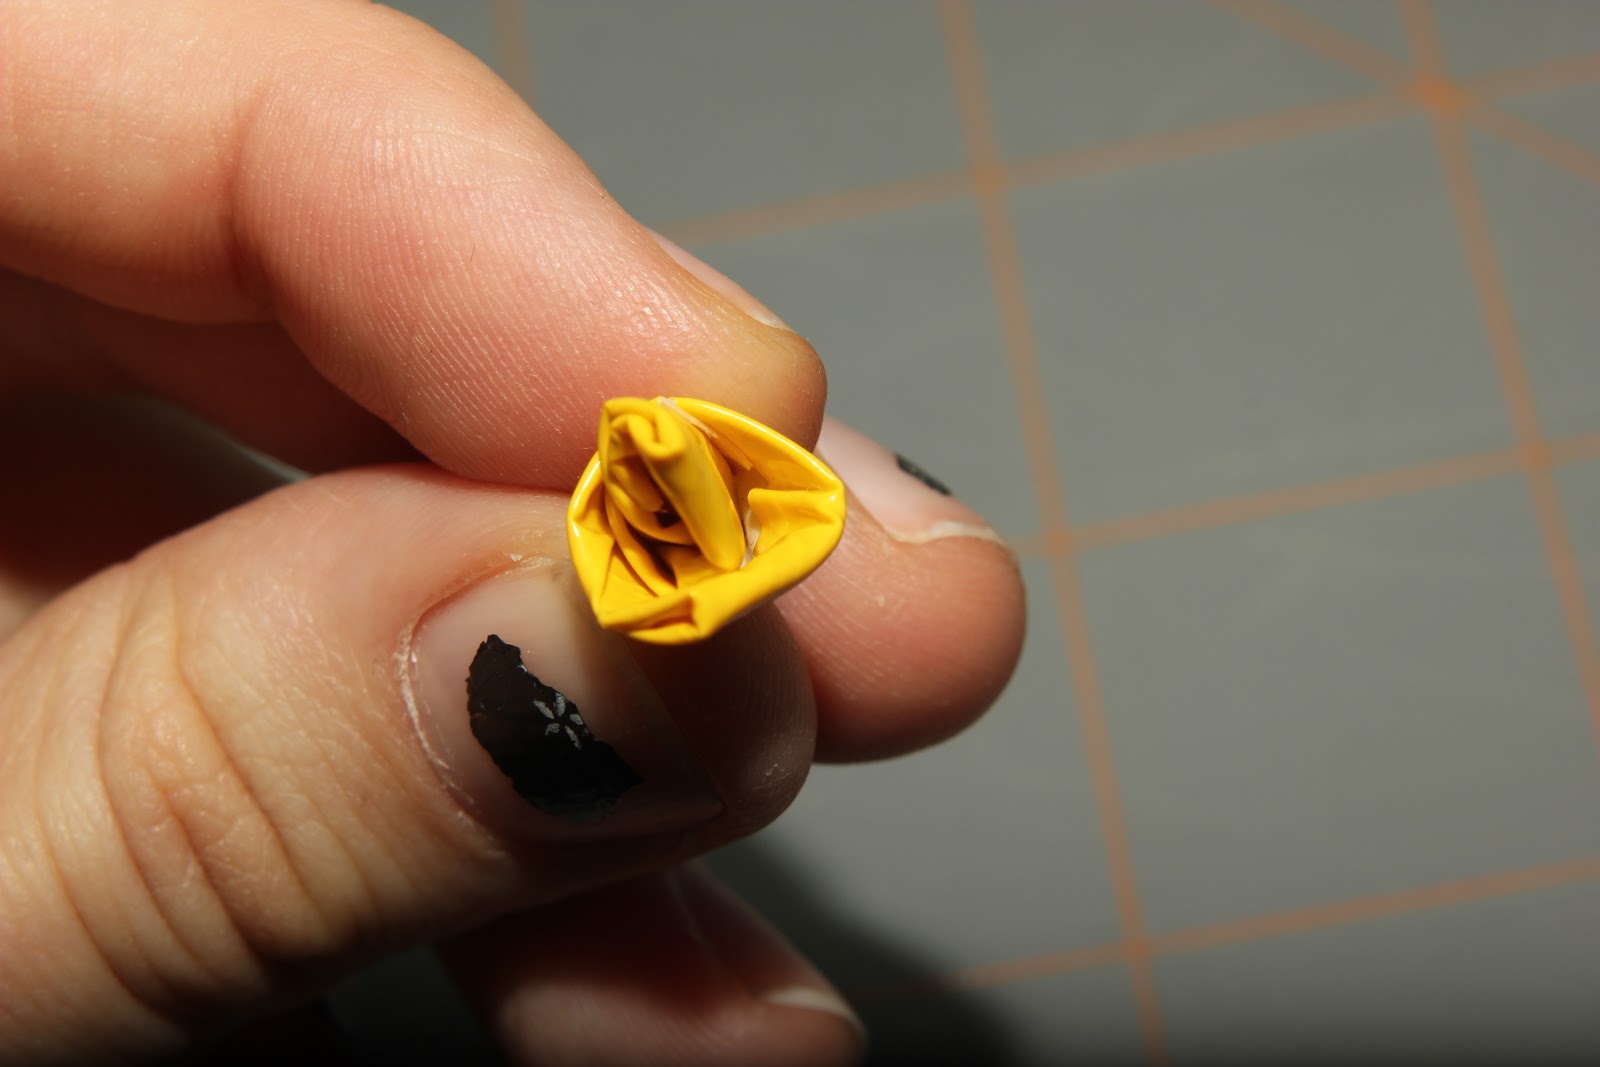
Step 9:
Add the remaining Petals/triangles on to get a small rose.

Step 10:
Set your center rose aside and cut 5 strips of tape about 7 inches long

Step 11:
Cut 5 pieces of wire about 3 1/2 inches long and place one at the base of each strip of tape

Step 12:
Fold the tape in half over the wire- Your Edges do not need to be pretty as you will cut them next

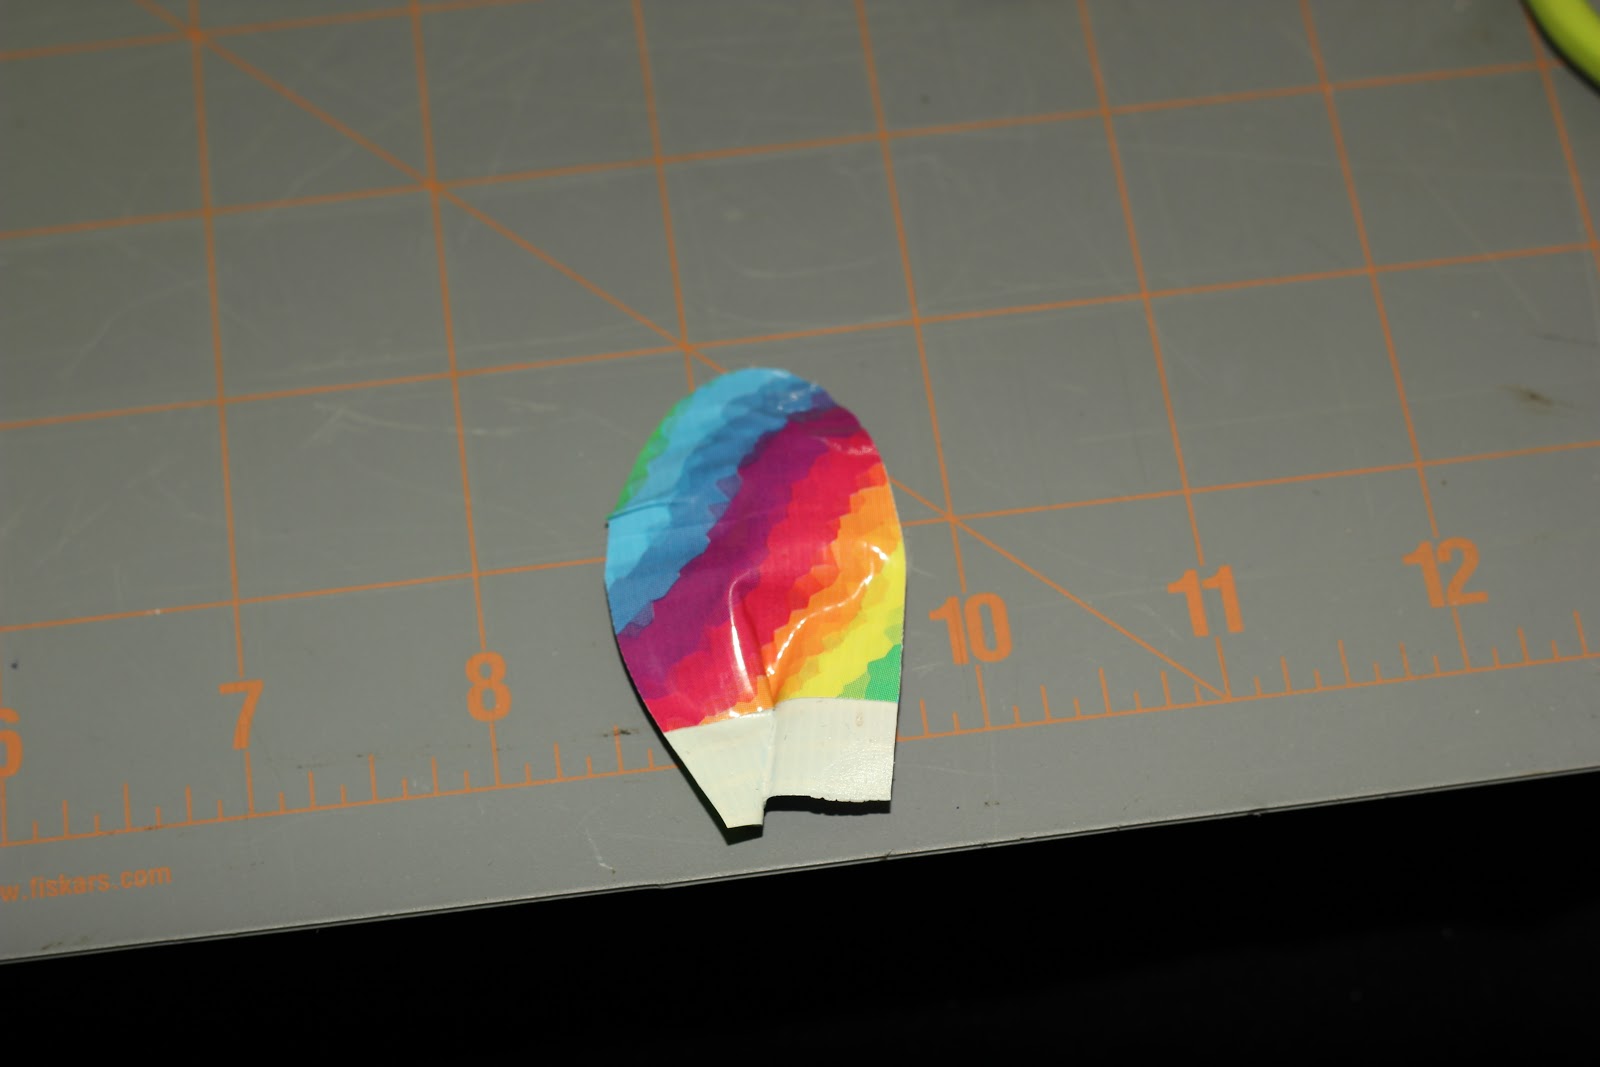
Step 13:
Cut a petal shape out of the duct tape leaving some adhesive at the bottom. Attach the petals to your center rose.
TADA! :)

I hope your flowers turn out FANTASTIC! Feel free to send us photos or comments of how yours turned out! We would love to see them!
~Sarah
Saturday, January 26, 2013
Duct Tape Flower Tutorial

We received so many positive results from our last Duct Tape Flower Tutorial, that I sat down this morning and did a second one! So here you go!!!

What You Need:
Duct Tape (I used 2 colors)
Scissors
Ruler or Cutting Mat

Cut 10 strips of duct tape about 4 inches long
Step 2:
Fold the duct tape in have with a small lip of sticky hanging out.


Step 3:
Cut a petal shape out of the duct tape.
Make a crease in the center of the petals

Step 5:
Atatch 5 of the petals together.
Step 6:
Now cut about a 2 inch piece of tape in the color you want to be your flower's center.

Step 7:
Cut a circle out of the tape

Step 8:
Add the remaining petals

There you go! I hope you have a fantastic time making this and if you are so inclined- feel free to send us an email with a picture of how yours turned out! :) We would love to see it! Leave a Comment Down below and let us know what you want to see next!
~Sarah
Friday, January 11, 2013
Kiss Nail Dress Review
I recently received Kiss Nail Dress in Babydoll to try and review from Influenster. At first glance I thought they were cute and could work. I have only used Nail Polish before and I was very intrigued by trying some of these stick and peels. When I took them out of the box, I was first overwhelmed by a Nail Polish smell- which I did not expect. I did not think that sticker nail designs would have a smell; but these do! They package comes with 28 strips, 1 nail file, and a Nail Design Booklet.
The Application Process was tedious but it was simple. It took me about a total of 30 minutes to apply the designs to my nails. The directions were clear and simple but like I said before- they are tedious to apply. The filing of them is probably what took the longest and the gems on each nail made them hard to file. Once I figured out how to do file the remaining off- it definitely went faster.


1 Hour after Application:
They nails Still smell but they are still on. The nails core colors are speckling already but are still holding strong. No major chips yet.
Next Morning:
They Lasted the Night! Wahoo! No major the chips and the smell has subsided!
2 Days Later:
They have chipped a minuscule amount and you cannot even tell that! I love looking at my nails- this is the longest my nails have stayed pretty!
5 Days Later:
OK one of my nails fell off but I am keeping the others on to see how long they will last. The minuscule chipping continues but still it is not very noticeable. Some of the jewels have fallen off but the you wouldn't know unless you touch the nail as Kiss has put Silver Sequins under each Gem so it still looks good!
7 Days Later:
Ok I finally peeled them off. I was tired of looking at the poor nail that didn't have one on it any more and the others had started to fall off. I am still very happy with the product as the packaging says it lasts up to 10 days and they made it 7! My nails don't normally allow nail polish to stick to it so I am very VERY Pleased with this product!
Overall:
I am very pleased with this product and have raved about it so much that I received another package for my Birthday! My nails are going to be styling! They chipped minimally compared to normal nail polish and I would certainly recommend these to any one who wants nice looking nails without the effort! Plus they are cheaper than going to a Salon!
~Sarah
I received this product from Influenster and this review is 100% my own opinion. I was not payed to write anything to sway you to one side or another.
The Application Process was tedious but it was simple. It took me about a total of 30 minutes to apply the designs to my nails. The directions were clear and simple but like I said before- they are tedious to apply. The filing of them is probably what took the longest and the gems on each nail made them hard to file. Once I figured out how to do file the remaining off- it definitely went faster.
1 Hour after Application:
They nails Still smell but they are still on. The nails core colors are speckling already but are still holding strong. No major chips yet.
Next Morning:
They Lasted the Night! Wahoo! No major the chips and the smell has subsided!
2 Days Later:
They have chipped a minuscule amount and you cannot even tell that! I love looking at my nails- this is the longest my nails have stayed pretty!
5 Days Later:
OK one of my nails fell off but I am keeping the others on to see how long they will last. The minuscule chipping continues but still it is not very noticeable. Some of the jewels have fallen off but the you wouldn't know unless you touch the nail as Kiss has put Silver Sequins under each Gem so it still looks good!
7 Days Later:
Ok I finally peeled them off. I was tired of looking at the poor nail that didn't have one on it any more and the others had started to fall off. I am still very happy with the product as the packaging says it lasts up to 10 days and they made it 7! My nails don't normally allow nail polish to stick to it so I am very VERY Pleased with this product!
Overall:
I am very pleased with this product and have raved about it so much that I received another package for my Birthday! My nails are going to be styling! They chipped minimally compared to normal nail polish and I would certainly recommend these to any one who wants nice looking nails without the effort! Plus they are cheaper than going to a Salon!
~Sarah
I received this product from Influenster and this review is 100% my own opinion. I was not payed to write anything to sway you to one side or another.
Monday, January 7, 2013
Hiatus
Hello Readers!
I wanted to inform you, as it is only polite, that I have lots of posts in draft forms currently but due to the high pressure and stress that midterms bring- no new posts will be up until the weekend! I hopefully will have a new tutorial or 2 coming up by then based on the outstanding reactions I got to my last duct tape flower tutorial! So keep your eyes peeled for that!
Until this Weekend,
Sarah
Subscribe to:
Comments (Atom)